
Digital DIY – Part 2
How to use computers to Master CDs and Design Album Covers
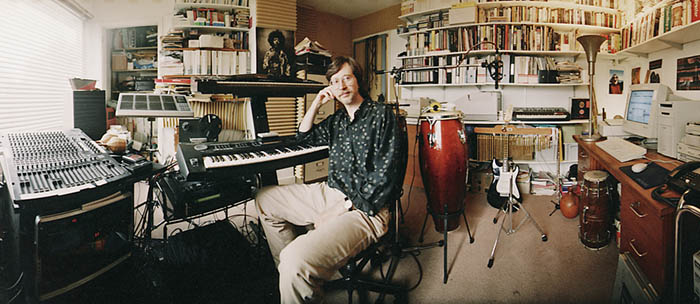
After a career in sound engineering and producing radio programmes including ‘The Science of Sound’ for the BBC, Clive Williamson now uses computers and digital technology at every stage of album production with his ambient group Symbiosis. In this second article on Digital DIY, Clive looks at how musicians can use computer technology to get their work from a DAT tape to the final product – the Compact Disc – with as few tears a possible! (Article originally appeared in Sound on Sound, August 1996)
It never ceases to amaze me that so many diverse functions can be carried out by just one computer in a music studio! Inside one box is the potential to edit digital sound, burn CD-Recordables with P & Q coding ready for glass mastering, manipulate and process digitised colour images, design covers for albums, and promote those albums with the help of business software and the Internet. Since many of us already own the computer, the temptation is always there to make that relatively small investment in additional hardware and/or software and Do-It-Ourselves! But just how easy is it to take this DIY approach to album-making? Frankly, the risks are high and the processes time-consuming, but the rewards – and the savings – can be great!
The exciting fact is that the downward spiral in the cost of digital equipment places everything I’m going to describe well within reach of the average musician, either now, or in the near future. It’s up to you to decide how much computers should help you control the way your music both sounds and looks, but maybe I can give a few useful pointers along the way! So far I’ve prepared three Symbiosis albums for release on CD and hopefully, through this article, I’ll be able to pass on some of what I’ve learned – and am still learning – to those of you who are determined to ‘have a go’ in the areas of digital mastering, burning CD-Rs and desktop publishing for your own albums.
Digital Mastering
Last month I described the digital evolution of the Symbiosis studio, and ways to get the best recordings using MIDI and the Alesis ADAT system. The next step is to compile the mixes to make the best possible product on CD. Very early on, I decided that the ideal way to do that was to use the SoundTools system and Sound Designer II software, which at that time was only available on the Apple Mac. I was already using a Mac IIcx for desktop publishing and word processing, but kept to an Atari for MIDI sequencing on Notator, so adding a SoundTools card to the Mac was the point where it first ‘crossed over’ into the recording studio environment. I have now upgraded to a PowerPC and AudioMedia II, but Sound Designer is still going strong, especially now that it gets support from software manufacturers other than Digidesign.
When I master a new album, I begin by assembling all the best takes from DAT tape onto a one gigabyte AV hard drive, taking each one into Sound Designer on the Mac through the co-axial digital input of the AudioMedia card, and noting the peak level on the meters as I do so. I record all the tracks for the CD at 44.1 kHz, so there is no need to convert the sample rate either in Sound Designer or through our Alesis AI-1 interface. The resulting files are saved in Sound Designer II format, which seems to have become the defacto standard for Mac digital sound editing. The basic task is to tidy up each track by setting the right amount of silence before the audio starts, fading each track in and out (so that the CD doesn’t have any abrupt changes in noise levels between the music), then making any alterations in gain needed to make the whole album balanced to listen through.
At this stage it is sometimes useful to have a good listen to the track to see if any EQ or further processing is necessary. There may be hum present, which can be digitally ‘notched-out’, or the track balance might be offset. There are a number of sound processing tools in Sound Designer which can take care of these problems, but lately I’ve been using some of the excellent Waves plug-ins to do these jobs – and more – because they extend the capabilities of Sound Designer and have a very good user interface too! My favourite Waves modules are the S1 Stereo Imager which can enhance and shift stereo images, the Q10 Parametric EQ (with it’s excellent on-screen graphics and highly musical results), and the L1 ‘Ultramaximizer’ for gain increase with minimal side-effects using peak limiting.
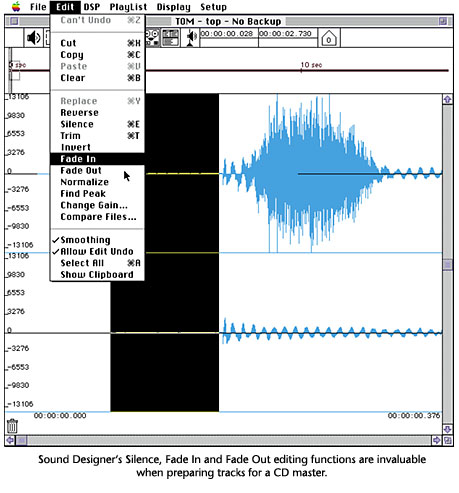
Once the final processing has been applied, I delete any unwanted silence at the start of each file, leaving at least 170 ms before the first audio on each track. Older CD players need about five frames to unmute after seeing the index point of a CD track, so it is safest to leave or insert about 70 ms (i.e. 5 / 75 frames per second) of silence on each track before the audio, to avoid clipping the music. (I add about 0.5 seconds for our ambient pieces, so that they begin after a suitable pause. A fast start is better for up-tempo music, or anything that is likely to be played frequently on the radio. DJs don’t like to be kept waiting to hear things!) As the output from our mixing desk isn’t completely silent, I always ‘edge in’ the atmosphere at the start of a track using Sound Designer’s ‘Fade In’ option (see Fig.1). About 100 ms up to the point where the sound is first audible usually works (making up the 170 ms). I then delete any unwanted silence at the end of the track, and use ‘Fade Out’ to the end-point. This prevents any abrupt changes in the low-level atmosphere between tracks.

Back to Part 1… How Symbiosis use Digital Technology to make their Music
The Digital Balancing Act
The MasterList utility for Sound Designer is very useful for the next stage in the CD mastering process: working out any level adjustments needed to make the album easy to listen to. I import all the tracks into MasterList, then audition them in context of the whole album, paying particular attention to the change-overs between them, and decreasing the level of any tracks that seem too loud. The old MasterList software only allows subtractive level changes, and chops off the quietest data to achieve the drop in volume, so if you’re thinking of exporting a file from the Mac back to DAT tape, it’s best not to do it at this stage. You would be loosing vital details in the music!
The trick is to use MasterList in reverse. If, for example, you end up with tracks at -4dB, -6dB, 0dB, and -1dB, the ideal solution (if you think that the -6dB track is already at – or near – peak digital level), is to add the greatest difference between tracks (i.e. 6dB) to the displayed levels to obtain the actual change that needs to be made to each soundfile: i.e. +2db, 0dB, +6dB and +5dB. In practice it may not be possible to increase the levels by this much (and this is where your notes on the peak levels from each track come in handy!) so you may have to compromise the gain increases you apply – and actually reduce the level of track two – but the point I’m trying to make is that it is much better to make as many increases as you can, rather than reducing the level of tracks, which is effectively reducing the maximum digital resolution. It’s also important to realise that using the ‘Change Gain’ function is a better way to make reductions in level than MasterList, because the samples are all mathematically rescaled to fit the new (smaller) dynamic range, rather than being thrown away.
So that’s my usual way of working. Another approach would be to normalise each track, then reduce the gain of any that seems too loud until the album is balanced, but this could mean processing the data twice for nearly every track, and I can’t help feeling that it would introduce more errors. (An interesting way to allow extra gain in a track using Sound Designer alone was pointed out to me by producer and keyboard player Guy Jackson, who uses the ‘Find Peak’ command in percussive tracks and then reduces just that peak by a few dBs, giving more headroom in the file as a whole.)
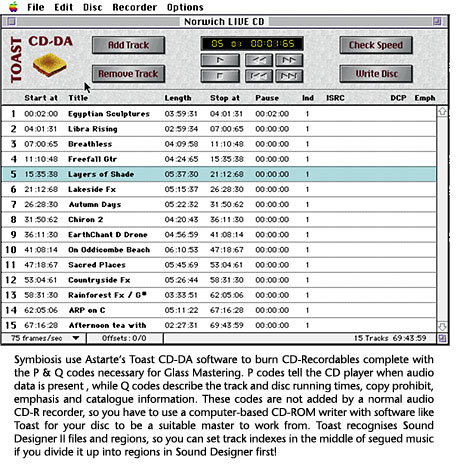
Once the level changes have been worked out, I save the MasterList file and leave the programme, then apply the ‘Change Gain’ command to the relevant tracks. Then I can go back into MasterList, re-open the list and check through the comparative volumes again, this time with the gains all set to 0dB. For our first CD, Lake of Dreams, I added musically-correct inter-track gaps in MasterList at this stage, then played the list out to DAT and sent the tape for production in Germany. Nowadays, using our own CD-ROM recorder with the Mac, I replicate the MasterList running order in Astarte’s Toast CD-DA software, and set the inter-track pauses there before burning a CD-R master.
The Advantages of CD-R
 Symbiosis invested in a Yamaha CDE100 Recordable CD-ROM drive a year and a half ago (1994) and although prices have fallen sickeningly since then, I’m still jolly glad we did! Being able to burn our own CDs gives us tremendous freedom in many ways. We can create a new set of backing tracks the night before a concert (see Fig.2), or make our own ‘white labels’ to give to DJs. We can back up vast quantities of data easily, and – most important of all – we can try out a new album before we send it away to be duplicated! This gives our mixes a chance to breathe. We can check them on different hi-fi (and lo-fi) systems, watch for level and timing problems that seemed OK in the studio, and easily re-order the tracks to find the best playing sequence. Adding CD-R to our digital studio has revolutionised the way we make albums, primarily because it lets us correct our mistakes before they go to the factory!
Now, when we’re happy with a Symbiosis album, I make a master disc from the Toast CD-DA software complete with the P & Q codes and send that to the manufacturer, saving about £200 on the cost of the first CD run. A growing number of CD manufacturers are able to work directly from a Recordable disc, and although I suspect the error rates are slightly higher mastering this way, it certainly is a convenient – and basically cheaper – way to go. The CD-DA software lets you decide on the pauses and copy protection, and select whether any tracks need to be replayed with de-emphasis. If you are registered with the right people, you can also record a UPC / EAN barcode on the disc, and details of any ISRC codes for individual tracks, which could help make sure you receive PRS payments from airplay. One word of warning to potential purchasers of a CD-ROM writer burning a CD is probably the most demanding thing your computer can do, since you need to have very high sustained data transfer rates through the computer and over the SCSI bus. So you need to check carefully that your micro and hard drive(s) are up to the task before investing in a CD-ROM writer, especially if you are hoping to make discs at four times speed! (Technical note: A total of 200 megabytes of data was needed for the colour photos in Part 1 and 2 of this article, so these were made into a Mac format CD-ROM on the CDE100 and sent to SOS in the post!)
Album Covers – the Final Frontier
The subject of DIY album covers is a difficult one, because most computers that are powerful enough to do hard disc editing can easily be upgraded with the right software to give you the tools to do DIY sleeve design. But having the right tools – and knowing how to use them properly – are two different things, and the trick here is to know your limitations, and when not to have a go! I’ve been very lucky in that ‘some of my best friends are graphic designers’, and I’ve had the chance to learn the necessary techniques involved in scanning and preparing images, typography and colour printing first hand.
A printer needs a set of four special lithographic ‘films’ to recreate an album’s artwork in full colour, so if you try to DIY, you’ll need to design your sleeve using desktop publishing software that can produce these films. The current versions of QuarkXpress or Adobe Pagemaker (now replaced by InDesign) are both suitable. These programmes are able to split, or separate, the colours in your on-screen design into their component parts of just four colours: the three secondary colours cyan, magenta and yellow, plus black. These ‘separations’ – known as CMYK, or 4-colour separations – are what are printed onto sheets of photographic film like giant negatives, and are sent to the printers to make the printing plates.
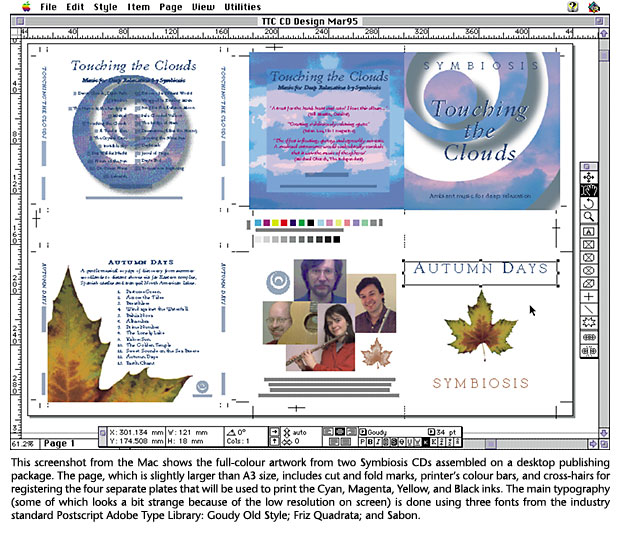
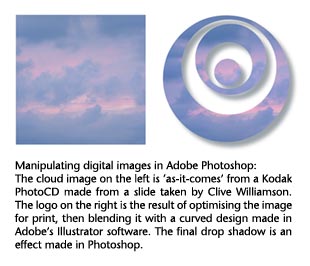
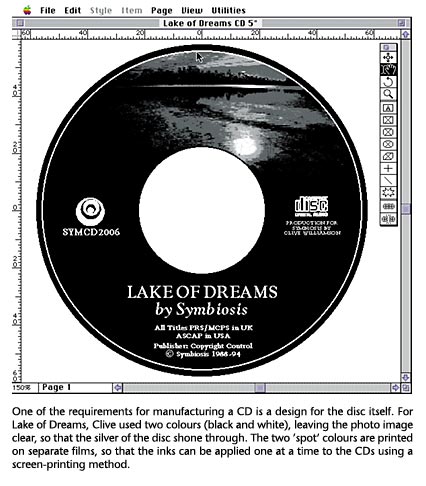
Any artwork or photos have to be digitized to be included in your design, and can come either from professional scans done at an image bureau, or more economically from the Kodak PhotoCD system. Ideally the images should be retouched and adjusted using a trained eye and Adobe’s excellent Photoshop software (available for Mac or PC) to optimise the final print quality. Another important factor is the typography: you need to install typefaces on your computer to use in the designs, and these sometimes need fine-tuning by hand to get the best letter-spacing. Besides the colour elements of the album cover, extra films are usually required for the black and white print inside the booklet, and for one or two colours to be screen-printed onto the CD itself, so the whole package is quite complex, and certainly isn’t something to undertake lightly. But once you get the hang of it, it’s exciting and satisfying too, so don’t let me put you off completely!
I could fill this entire issue with details about the printing process, but they won’t let me, so try to read the booklet that comes with Pagemaker called the ‘Print Publishing Guide’, which gives a good overview of the process. The most important thing to remember about an album cover is that often it is the first way people encounter your work. After all the effort that goes into making the music, I think it’s vital that a record should look as good as it sounds, so budget for a good sleeve right from the start.
(NB for an alternative version of this topic with more information for designers, see bottom of page!)
Computers and your Business
If you still have any time or energy left after making the music, burning the CD and maybe even designing the cover, remember that the computer sitting in your studio can also be a great help with your business activities. In the Symbiosis studio, our Mac runs Microsoft’s Word 6 for letter writing and contracts, Claris Filemaker Pro for invoicing and a customer database, and all the DTP software gets used to design fliers and catalogues. A very useful addition to the system has been a Global Village Teleport modem, which lets us fax directly from the computer, and has opened up the possibilities of electronic mail and marketing via the Internet. We are currently taking a leaf out of the bigger bands’ books, and building a Web page to let people find out more about the group and our albums, and even to hear extracts of our music. Ideas, hardware and software change all the time, and now we are excited by the possibilities of releasing CDs with a data track, combining graphics, photos, text and videos with our music, using Macromedia’s Director multimedia software.
Conclusions
Technology today puts many musicians in a unique dilemma: we have to juggle our time to make music with the time needed to learn new computing and recording skills and to promote our work. If we can learn to balance all three elements, then computers really can help us to open a lot of doors. We also need to take time to make the right choices about if and when to buy attractive new hi-tech equipment, and above all, try not to get upset with equipment that doesn’t work as it should. It seems that the more software I try to run on my machine, the less smoothly it performs, and nothing kills the muse quite like ‘Techno-Rage’.
I think that the best work often comes from an almost invisible use of technology! Much of the music made in the 80’s very obviously showed the shape of it’s computer-made mould, but now we’ve progressed to the point where the technology can be transparent, letting true musical creativity shine through!
* * * * * * * * *
My thanks to Adobe Systems, Leading Edge and Sound Technology for their help in preparing these articles, and special thanks to Della Drees, Micheline Mannion, and Brian Whitehead for their invaluable design advice and assistance.
_________________________________________________________________________
HOT TIPS – Editing and Mastering digital sound
– Don’t loose ‘bit-depth’ when mastering: mix as close to the maximum digital level as you can.
– To avoid loosing detail in a digital editing system, rather than changing gain or EQ several times, go back to the original and try to make changes in one go.
– Programs like Deck II (or ProTools) can help with overlapping segues, or making changes in level using MIDI faders.
– Always use the dither option in Sound Designer II and ProTools to prevent low-level quantizing errors.
– Keep a dust free environment to avoid ‘shadows’ when burning CD-R discs.
– Listen through any DAT or CD master for errors before sending it to be duplicated.
– Note the time and details of any known unremovable glitches in a master and send a report with the DAT tape or CD to be duplicated.
 Computer Graphic Design Tips
– Editing digital images takes lots of RAM and hard disc space: ideally, allocate space on a second ‘scratch’ disc to speed up work in Adobe Photoshop.
– A graphics tablet with a pressure-sensitive pen makes short work of retouching in Photoshop, and is great for creative artwork in programmes like Fractal Design’s Painter.
– Colour images for CD and cassette covers are large (typically 18 and 8 megabytes respectively) so you need some sort of removable media to transport files to and from your image bureau.
– To keep bureau charges down, use Photoshop to prepare any digital images to print at the actual size of the finished artwork, and convert scans and PhotoCDs from RGB to the CMYK format if necessary.
– Images should be prepared to twice the resolution of the final films: e.g. 300 dots per inch (dpi) for 150 dpi resolution films.
– Images often need to have their contrast reduced to compensate for the spread of ink, known as ‘dot gain’, when printing.
– Images should ‘bleed’ over the final dimensions of your sleeve to allow for variations in cutting out or ‘finishing’ the covers.
– Remember that the CMYK process can only reproduce some of the colours you see on screen, let alone all those in real life!
– Don’t trust any colours you see on the screen: get proofs to help you calibrate your system, and if possible, specify ‘spot’ colours in your design from the industry standard Pantone colour swatch.
– Don’t use too many typefaces in any one design – it can look cheap!
– Check all spellings, and have as many people as possible look at your proofs for mistakes.
– Have a colour proof made of your final design (e.g. an Iris Proof, or a Chromaline). Make sure you are absolutely happy with it before sending it to the printer, as it is like a contract between you!
– Watch out for poor registration of the four colours, over or under inking, inaccurate colours, or poor ink density in the printed results.
Computer Health & Safety
– People in music studios tend to forget, but it’s best to take note of EEC guidelines for the sustained use of computers:
– Take frequent breaks from working at the screen.
– Try to use a recent monitor with low static and elecromagnetic emissions.
– Use a sharp screen with a high refresh rate and no strong reflections from windows, doorways, or lights in the studio.
– Avoid viewing your computer screen under neon lighting.
– Sit comfortably at the computer, and move about during rest periods.
– If you use an old colour monitor with high electrostatic emissions, consider placing an ioniser nearby to neutralise its effects.
SYMBIOSIS EQUIPMENT FEATURED IN THIS ARTICLE:
| COMPUTER SYSTEM Apple PowerPC 8100/80 AV Apple CD-ROM drive NEC MultiSync 5FG colour monitor Quantum 1Gig AV Hard Drive Syquest 44/88 Removable Hard Drive Yamaha YST-M10 speakers |
DIGITAL EDITING Alesis AI-1 Interface Alesis Q2 & ADAT AudioMedia II Digidesign Sound Designer II E-Magic Logic Audio Marantz CD 52 SE CD player (with digital o/p) Macromedia Deck II Sony DTC-A8 DAT Sony DTC-D7 DAT Waves Plug-ins |
FOR CD-Rs Yamaha CDE100 Recorder Toast CD-ROM Pro Astarte CD-DA Yamaha & HHB 4x speed Blank CDs |
COVER DESIGN Adobe Illustrator Adobe Photoshop Adobe Pagemaker Adobe Postscript Fonts Epson GT-9000 Scanner Fractal Design Painter QuarkXpress Wacom ArtPad |
P.R. & MARKETING Claris Filemaker Pro Global Village Teleport Modem Kodak PhotoCDs Kodak ColorEase PS Printer Microsoft Word Microsoft Excel Macromedia Director |
This artice originally appeared in Sound on Sound magazine, July & August 1996
(c) Clive Williamson, 1996
Back to Part 1… How Symbiosis use Digital Technology to make their Music
ALBUM COVERS – alternative version:
Album Covers – the Final Frontier II
The subject of DIY album covers is a difficult one, because most computers that are powerful enough to do hard disc editing can easily be upgraded with the right software (such as Adobe’s Photoshop and Indesign or QuarkXpress) to give you the tools to do DIY sleeve design. But having the right tools, and knowing how to use them properly are two different things, and the trick here is knowing your limitations, and when not to have a go! I’ve been very lucky in that ‘some of my best friends are graphic designers’, and I’ve had the chance to learn the techniques involved in scanning and preparing images, typography and colour separations first hand. Frankly, it isn’t something to undertake lightly, but once you get the hang of it, it’s exciting and satisfying too, so don’t let me put you off completely!
First, it’s important to find out exactly what a CD manufacturer needs to print your album cover. Most prices quoted by duplication companies are to make your album from DAT tape (or, as we’ve seen, from a P & Q coded CD-Recordable) and from artwork supplied ‘on film’. This implies that the artwork has been prepared professionally, and is ready to go straight to the printers in a standard form and needs no extra work from the manufacturers themselves. For a normal CD jewel case, the print is usually a four-page Booklet for the front cover and an Inlay Card for the back. The Inlay Card and the two outside pages of the Booklet are printed in ‘full colour’, while the two inside pages are normally one colour (i.e. black and white). Standard industrial printing for full colour is known as the 4-colour process, where the colours in the design work are broken down (or ‘separated’) into components of cyan, magenta, yellow and black, and printed consecutively using the correct amount of inks in those colours. The ‘films’ that are needed to do this are very high quality separations into the four colours, which can be generated from your computer artwork if it has been designed using appropriate software. Each film is made by exposing a wide sheet of photographic film in a special image-setter, so it comes out looking like a huge black and white negative. The set of four films is known as CMYK separations (for cyan, magenta, yellow and black) and contains all the information for a printer to make up metal printing plates and mass produce your artwork. (Any photos or blocks of colour in your design are rendered in a tiny pattern of dots. To the naked eye, the dots merge in the printing process to produce the ‘full’ colour again.)
 Quite apart from the difficulties of designing a good cover, the most important thing is to have an understanding of the 4-colour process, and to make all the elements of your design work within its constraints. For example, the CMYK separations cannot physically reproduce all the colours on your computer screen, let alone the huge range that occurs in real life – so you have to choose colours carefully to fall within the printable range, or ‘gamut’. Ideally, your computer should be able to reproduce colours to 24-bit accuracy, and the colour screen must be adjusted to give as neutral a colour balance as possible, so that you get the best idea of what the printed results will look like. It’s also advisable to get some kind of colour proof printed by an image bureau early on in your design work, so that you can see how the colours on your screen compare with the results on paper, and adjust – or calibrate – your computer screen or your designs accordingly.
Specifications for Printing
Whether you decide to design the cover yourself, or hand it over to a graphic designer from the start, you will need to find out the specifications that your chosen CD manufacturer needs to work to. These usually include whether the films should be positive or negative, which side the emulsion should be on, and the number of lines per inch (lpi) or dots per inch (dpi) that photos should be broken down (or ‘halftone screened’) into. This is typically about 150 dpi for the cover, but is often less for printing on the CD itself, where pictures are typically rendered more coarsely at 90 to 110 dpi. A CD package deal usually allows only one or two colours on the CD, and these are generally specific colours which have to be chosen from the industry-standard Pantone range.
If you’ve not tried designing your own covers yet, I think you’ll se that there is a lot to learn, and mistakes can be costly. I guess that’s why CD manufacturers can charge around £400 to prepare a cover from your camera-ready artwork – or upwards of £500 to do the design work for you – and why it’s often so tempting to try the DIY approach! Even if you do pass on the job to someone else, I think it’s invaluable to have a good grasp of the processes involved, so that you can understand the high cost of graphic design expertise, and learn to spot the errors yourself! The most important thing to remember about an album cover is that it is often the first way people encounter your work. After all the effort that goes into making the music, I think it’s vital that a record should look as good as it sounds, so budget for a good sleeve right from the start.
‘Album Covers – Alternative Version’ (c) Clive Williamson, 2007. (Written 1996, first published 2007.)
Back to Part 1… How Symbiosis use Digital Technology to make their Music
Sponsored by Clive Williamson’s acclaimed ambient group SYMBIOSIS: “A treat for Head, Heart and Ears!”

Find out about their gentle albums of music and nature sounds for relaxation here
or search for ‘symbiosis’ on
![]()